Q1 Nothing happens when I select Camera9 to Camera12
Q2: How do I delete recordings, snapshots or motion detections?
Q3: Whats’s the best way to update HSS when you release a new version?
Q4: I can’t seem to be able to delete images in the snapshots area.
Q5: How do I include my own ‘rtsp’ camera(s)?
Q6: How do I use the “label” feature in HSS release v1.2.0 onwards?
Q7: How do I use an external AI object processing system with HSS?
Q8: Adding a new button (for another set of presets)
Q9: How do I activate the Daily Housekeeping Report?
Q1: Nothing appears when I select Camera9 to Camera12.
A: Make sure you have started the appropriate flow for the camera.
Click the ‘inject’ node to start the flow. In the example, shown below, the RedBull video channel has been started as can be seen by the message (saying the video stream is running) just below the HSS_mp4frag Subflow icon.

Another thing that can sometimes happen (when a flow is first deployed) is that some
of the nodes in the sub-flows fail to initialise.
This is shown by a small red triangle
appearing above the node (see screen-shot below).
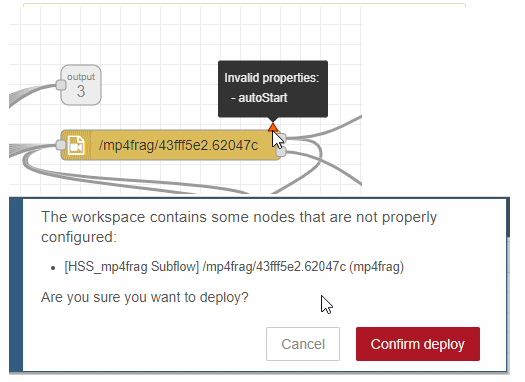
Edit that node and change 'id' to 'idx', exit the node then go back and change it
back to 'id' and you should be set.
It is a known issue with this node.
Go back to the top of this page.
Q2: How do I delete recordings, snapshots or motion detections?
A: Let’s assume you want to delete one or more snapshots.
Click the drop-down menu that says ‘Show snapshots’ in the Main Display area. Then select the appropriate day-folder.
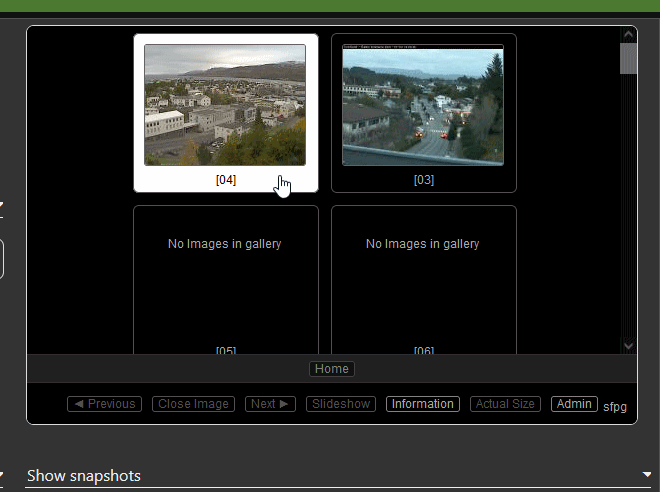
The 4th of the month (e.g. [04] ) has been selected in this example. The images captured on that day are now shown.
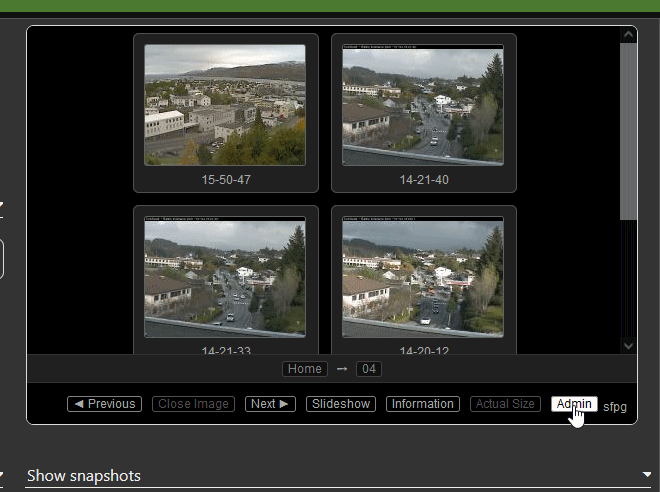
Now click the [ Admin ] button and then select which images are to be deleted by clicking each one.
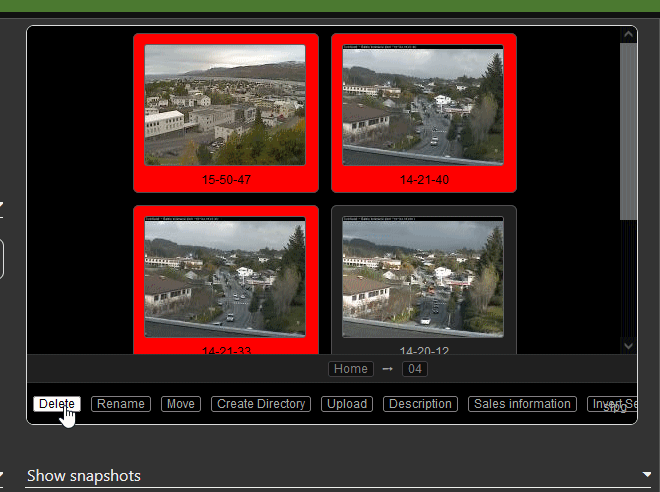
The border for each image will turn red. Click the [ Delete ] button when you completed your selection process.
The same sequence can be used to delete recordings or motion detection - you just need to select the appropriate drop-down menu.
BE VERY CAREFUL - you can easily delete a day-folder if you click the [ Admin ] button BEFORE going into the day-folder.
It is suggested you try deleting one or more images so you become familiar with the key-sequence.
Go back to the top of this page.
Q3: What’s the best way to update HSS when you release a new version?
A: The best way is to switch on the 'projects' facility in Node-RED then you could create a new project and download the latest json file to it. This means you can switch between the two (or more) projects anytime you like, so if something didn't work - you could switch back to the one that did. There are details on how to do this on the Forum, but basically you need to edit the settings.js file which is located at… /home/pi/.node-red/settings.js
Scroll down and change the line that starts with enabled so it reads… enabled: true,
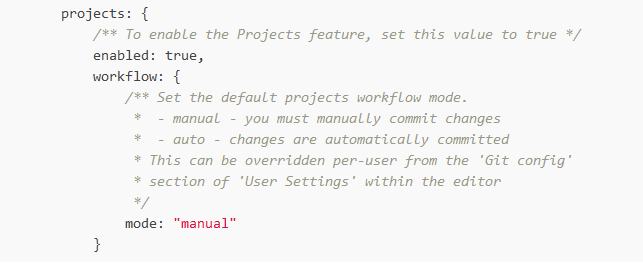
Go back to the top of this page.
Q4: I can’t seem to be able to delete images in the snapshots area.
A: It was discovered, in an early release of HSS, that the permissions on the 'snapshots' directory may not be correct which will prevent snapshots from being deleted. The 'housekeeping' script that handles this has now been updated.
If you are affected by this issue, just go to HSS Setup SAS tab/flow and re-run Step 1 and 2.
Go back to the top of this page.
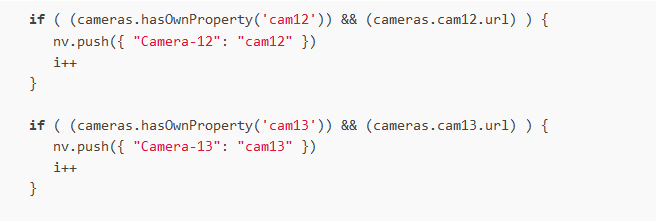
Q5: How do I include my own ‘rtsp’ camera(s)?
A: Tabs "IP CAM9" to "IP CAM12" currently support rtsp streams from TV channels.
To change one of these tabs to your own or to add a new tab requires a bit of manual editing. We could not find a better way to automate things, we really wish we could but for now, it is a bit like this unfortunately
You need to use one of the pre-configured IP CAMX tabs for that camera. Or create (copy) into a new tab like IP CAM13 etc, then in that insert the rtsp url similar to the others.
In addition before it will work you will also have to:
- edit your hss_config.txt file and add a section in there for the new camera, assuming "cam13"

- in the tab "HSS Initialization" edit the function node "Build Name/value pairs for
dropdowns"
and add a section in here as well for the new camera
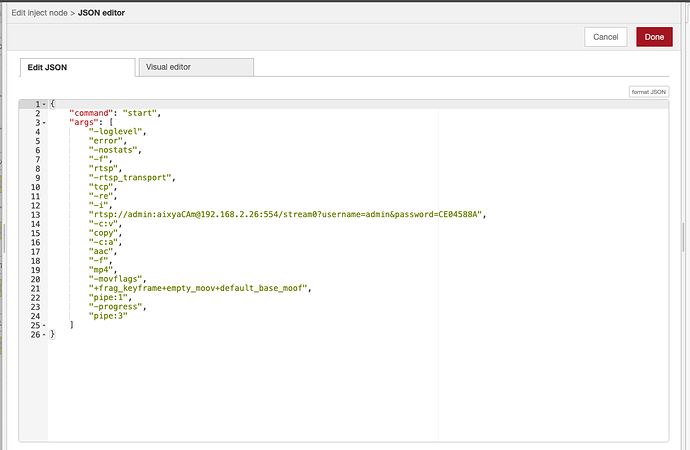
You also need to configure your camera params in the appropriate flow-tab. See below the example for RedBull TV.
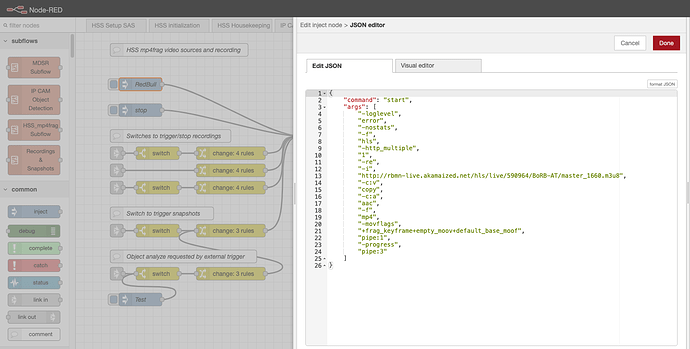
Open the inject node and look att the params configured. Those are params needed for ffmpeg. In there you see the actual url, "http://.....", this is where you should put your "rtsp://......"
Deploy & run the initialization, you should then have the new camera (like cam13) in the drop-downs. Try to start the stream first and then you can select the camera to be presented to any of the monitors
If you have many rtsp cameras, you will have do this for each of them. The samples provided for cam9 - cam12 can of course be re-used, you just modify the url in the inject node for each camera in the respective tab. But if you have more than 4 rtsp cameras, you have to add tabs and modify the settings as described above. We do not know where the limit is, you can configure as many as you like, We do not know what the cpu load is when you start a stream from a rtsp camera, maybe it is not that high?
Go back to the top of this page.
Q6: How do I use the “label” feature in HSS release v1.2.0 onwards?
Starting with
release version v1.2.0, HSS now allows a “label” to be associated with a camera and
the media links. This means that HSS is even more user friendly by allowing sensible
names to be given to items.
To accommodate this, the object structure for each camera has been extended as shown below.
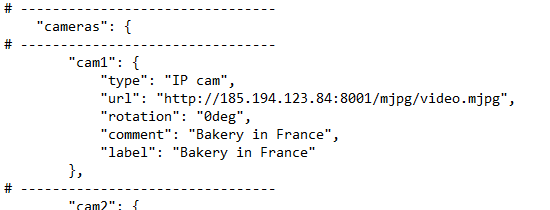
The “comment” line now has a comma inserted at the end of the line. The “label” definition is inserted after the “comment” and must not end with a comma - as it is now the last line of the object definition.
Although the text for the “label” can be any length you like, you will find if you restrict it to 22 or less characters it will fit nicely on the four small monitors.
Obviously you need to insert a “label” definition for every camera you have declared in the config file.
There is no need anymore to declare a blank camera definition if a camera is not being used - just skip it. So you could, for example, have a definition for “cam1”, “cam2”, “cam3”, “cam4” followed by “cam9”, “cam10, “cam11” and “cam12”. HSS just reads each definition and builds the drop-down menu for you.
The other useful feature is you can use a “label” to identify your media links.
Here’s an example of the new format.
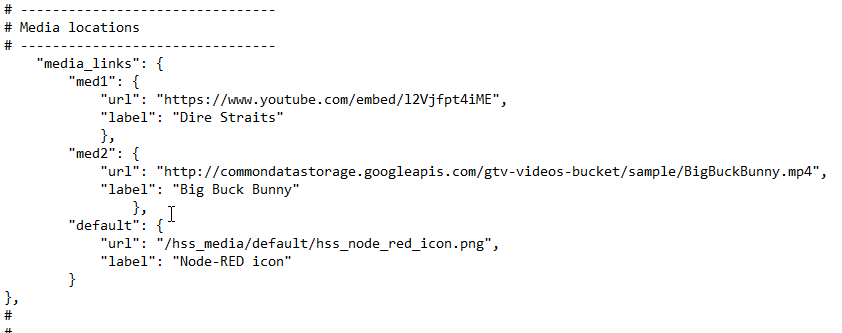
If you inspect the above listing you’ll see that each link is an object definition enclosed between curly brackets. You just need to insert the “url” reference and the “label” name for each link. Please note that each object definition EXCEPT the very last one has a comma after the closing curly bracket.
Just like the camera definitions, you can insert (within reason) as many media links as you need. In this example a “default” link has been included which will place a icon (that shows the Node-RED logo) on any of the five monitors.
It is suggested you take a look at the config files, that should be in your document root area, and modify them to suit your needs.
The supplied config files are… hss_config_basic_nf.txt, hss_config_sample_nf.txt and hss_config_plain_nf.txt
Note: The _nf.txt suffix indicates that you are using the New Format configuration file.
Go back to the top of this page.
Q7: How do I use an external AI object processing system with HSS?
HSS supports object
detection that can be triggered on request using various kinds of triggering from
devices like IR sensors, presence detectors etc. For this purpose the flow has been
prepared with link-in nodes that you can use, see below. In the latest version (HSS
v1.2.0 onwards) a facility has been introduced to give you the option that you can
select if you want to use the internal object detection or an external object detection
service of your choice, like a Python script or similar.
When should I use the internal or an external service?
This is a matter of personal choice. The internal mechanism works fine for most cases but if you have developed a solution you would like to use instead, there is now an option to quickly and easily interface with it.
There are two places, in HSS, where you can connect your external AI object processing system - HSS MDSR (Motion Detection Selective Recording) and IP CAMX (where your IP camera or an external camera are connected).
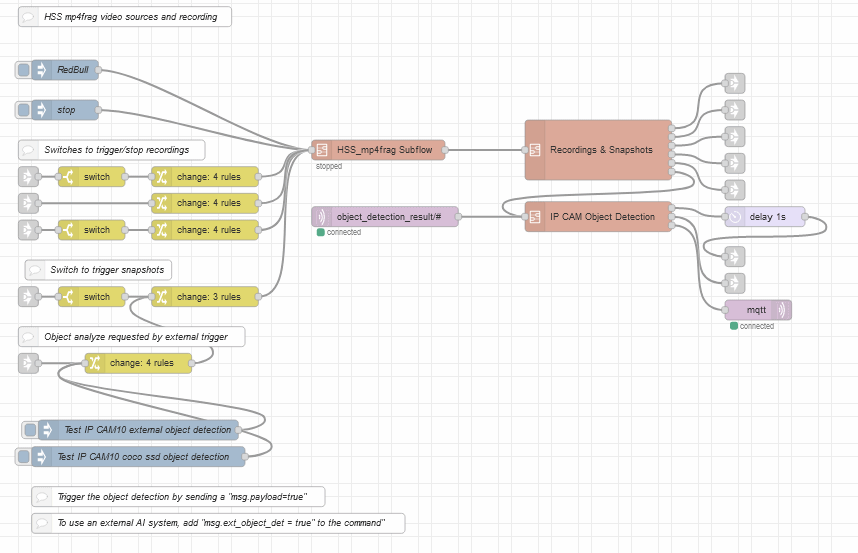
If you go to the HSS MDSR flow/tab you should see this…
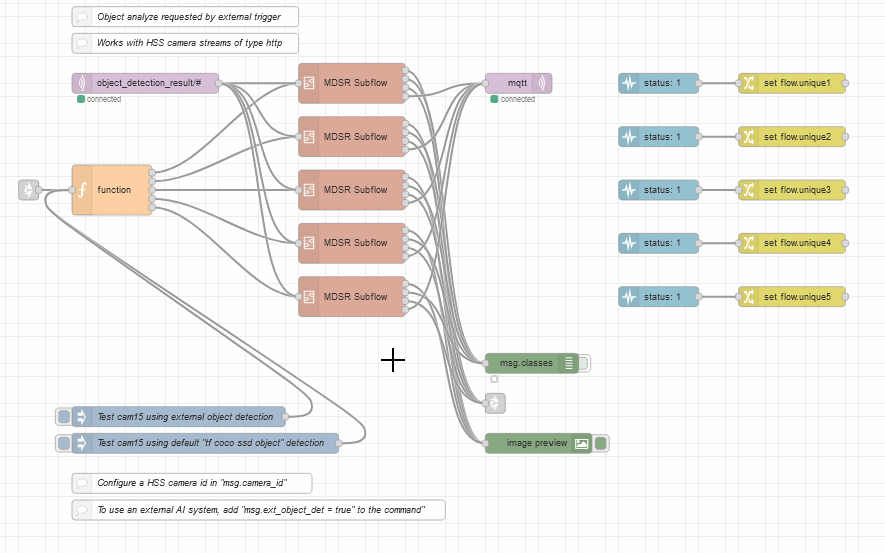
When using an external service we are assuming an MQTT interface. HSS will publish the image data to be analyzed to an MQTT broker on a topic unique to the “camera_id”.
The MQTT-Out and MQTT-In are the hooks to your AI external processing system. (Note: MQTT is the preferred method to interface with your equipment as it easy to install and you probably have it set-up already.) The MQTT-Out node has a topic name of “object_detection_request/camX” where camX is the “camera_id” of the camera making the request.
So as an example for ”cam10", it will be published to topic "object_detection_request/cam10”. The external service is assumed to be subscribing to the topic ”object_detection_request/#” and, after finishing the object analysis, is expected to return and publish the annotated image data back as payload to topic ”object_detection_result/cam10”. If no objects are found, the service must publish an empty payload. The MQTT-In node on the above diagram handles the incoming results from your AI system.
Note: You need to ensure your AI external processing system matches those topics.
If you look at the lower part of the above diagram you will see two Inject nodes. At the moment they are for testing purposes but will need to be replaced by the mechanism (e.g. a link-in node from a Node-RED flow) you will be using for motion detection.
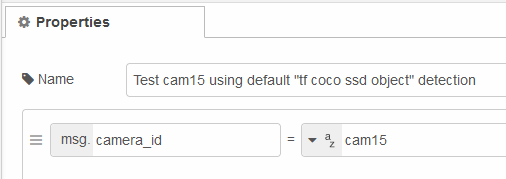
If you look inside the Inject nodes you will see you can define which camera you want to analyse and whether you want to use the built-in ‘tf coco ssd’ node or an external AI system for object recognition. Here’s an example for cam15 with internal object processing.
Below is an example of how you would select an external processing system for cam15.
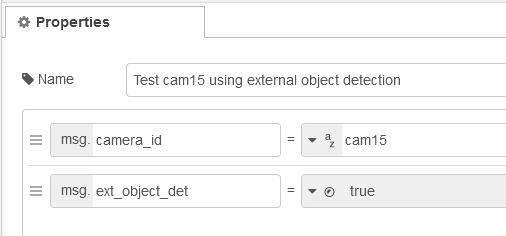
As you can see the message payload is made up of the “camera_id” and “ext_object_det” settings. All very simple settings.
If you go to IP CAM10 flow/tab you should see this…
You should be able to spot the “hooks” on this flow as their positions are very similar to the HSS MDSR flow.
The MQTT-In and MQTT-Out nodes use exactly the same topic format as described above. Likewise, the Inject nodes work in the same way as previously described. Note: There is documentation (e.g. comments) to help you with these settings on the flow/tab.
Although the above example was applied to the IP CAM10 flow/tab, the same “hooks”
can be implemented on other camera flows.
The HSS Team have tried to make these “hooks” as easy as possible to use and would be interested to hear your feedback.
Go back to the top of this page.
Q8: Adding a new button (for another set of presets)
Adding an extra button to HSS
is a fairly easy task if you are familiar with Node-RED and can find your way around
the flows.
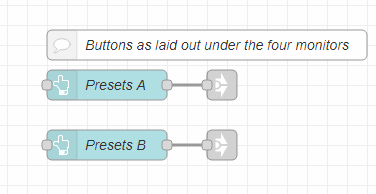
This example shows how to create a new button that will select a second set of ‘presets’. So at the end of this exercise you will have two buttons labelled A and B to select a different set of cameras for the five monitors.
The first step is to create your new button. Probably the easiest way is to copy the button and then change its attributes.
In this example the width of the each button has been changed to ‘1’ and the wording
“Presets” has been shortened to “A” and “B”.
You will need to create a Link-Out node, on the HSS Buttons flow/tab, and join it to a Link-In node on HSS Presets flow/tab.
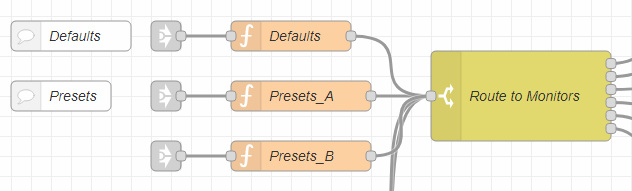
Then copy and paste the function nodes so you have two function nodes - Presets_A and Presets_B
Now edit both function nodes and make a simple change to line 2 as shown in the next
two screen-shots. 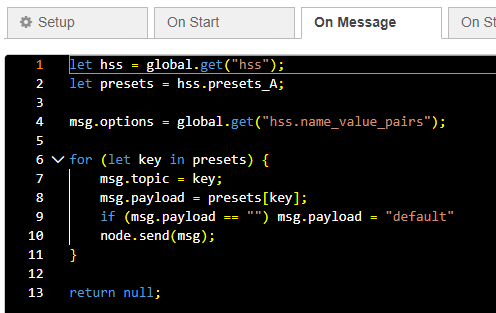
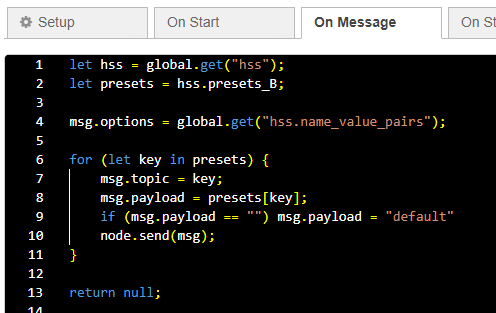
These two function nodes will look for an entry in your config file labelled “presets_A” and “presets_B” respectively.
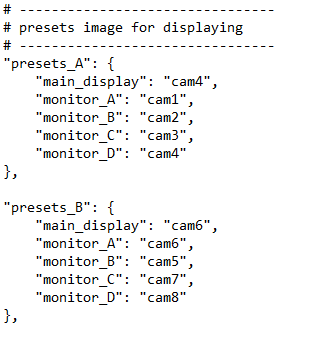
The last step is therefore to modify your config file so it contains the matching definitions as shown below.
Save the changes you have made to the config file and, if you haven’t done it already, [ Deploy ] your Node-RED flow.
Your new button should appear on the Dashboard. It should be noted the way the flow is organised on the HSS Presets tab means that Presets_A will be selected as the default when you start or initialise the flow. This can easily be changed (to Presets_B for example) by altering the connection points on the Link-In nodes.
Go back to the top of this page.
Q9: How do I activate the Daily Housekeeping Report?
Just after midnight, HSS runs
a routine to remove and recreate a day-folder in the ‘motions’, ‘recordings’, and
‘snapshots’ storage areas. There are 31 folders in each of these areas that hold
material (e.g. images and videos) collected during the day. To avoid the free-space
on your memory or storage system gradually disappearing, these folders are recycled
on a monthly basis. To achieve this a housekeeping script is executed at 5-minutes
past midnight each day and a report is generated.
Here’s part of the flow you will find on the HSS Housekeeping flow/tab.
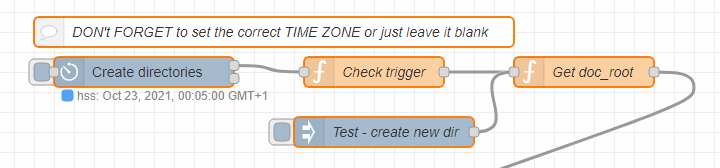
The CronPlus node is set to trigger at 00:05:00 hrs with respect to your server’s time-zone. If for some reason your server isn’t set to the correct time you can set an appropriate time-zone value within the CronPlus node. Leave it empty if your server’s time is correct.
Here’s part of the flow on the HSS Housekeeping flow/tab that calls the bash script… /home/pi/housekeeping.sh
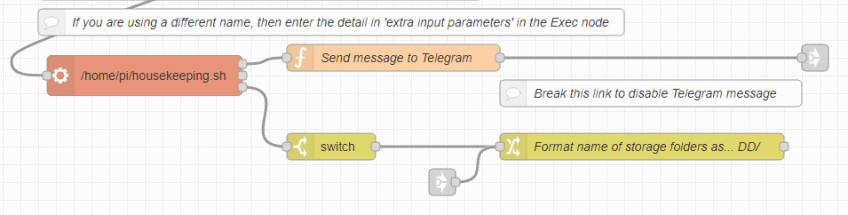
The bash script produces a text report, every time it is executed, which is available at the top output of the Exec node. The report is passed to the function node where it is formatted so it is suitable for transmission via the Telegram node to your mobile or computing device. To activate the reporting mechanism you need to make sure there is an active link from the function node to the Link-Out.
You may find this link is disabled by default. Just enable it to obtain Daily Housekeeping Reports.
Here’s an example of a Daily Housekeeping Report delivered to a Telegram account on a mobile phone.

The HSS Team hope you have found this information useful and that it has answered your question.
Go back to the top of this page.
More FAQs will appear here as and when we receive them.